
Log a live roast in Factory: the curve, rate of rise, gas, fan, drum and markers
The cockpit is one screen for the whole roast: live curves on the left, numbers and faders on the right, and four stage buttons along the bottom. This is where you log a batch from charge to drop.
9 min read Updated October 19, 2026
Everything before this point was preparation. With a weighed batch on the Schedule and the probes streaming, you watch the curve and press four buttons at the right moments, or let Factory press them for you. Every sample, fader move and marker is written to the device as it happens, so the record captures the run rather than notes typed up afterwards.
Start the batch
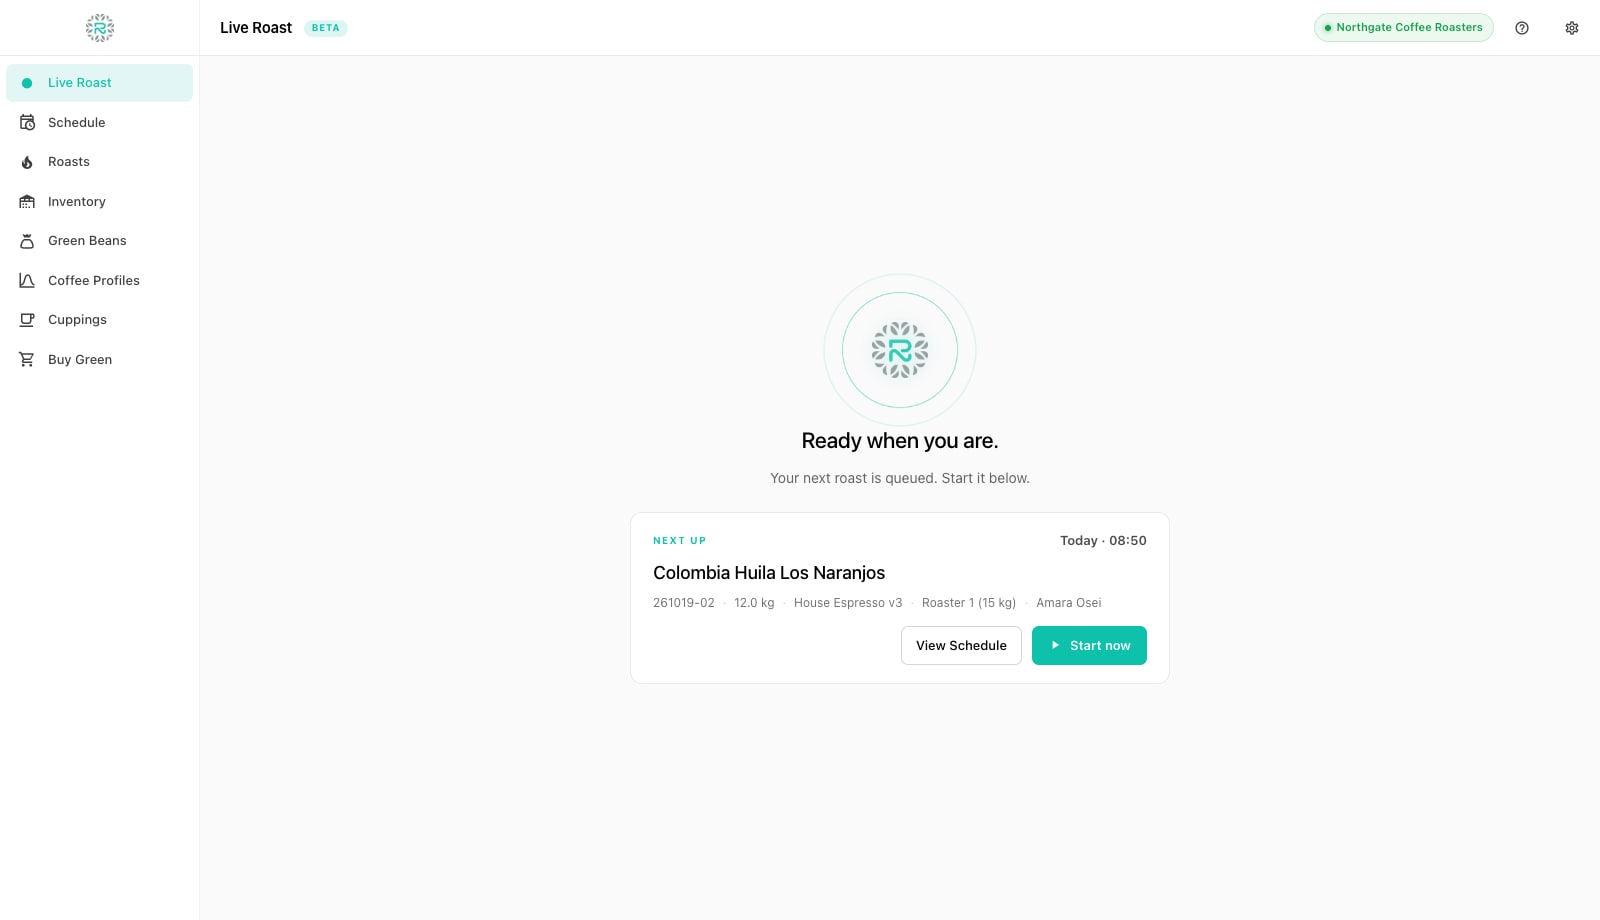
- Open Live Roast. With nothing running, the screen shows the next weighed batch under Next up with its coffee, batch number, weight, profile, machine and operator. Press Start now. (From the Schedule, open the weighed row and press Start instead; both do the same thing.)
- The cockpit opens full width with the batch bound to it. Check the three menus in the top bar: Machine, Target profile and Operator. They are pre-filled from the schedule; change the target here if you want to follow a different profile or a specific past roast.
- Confirm the status pill at the top right reads Live with a sample rate (connected) or Recording locally (offline). If it says the machine is disconnected, open Preferences, Hardware, and press Start feed. Without a feed the chart stays empty: Factory never invents a curve.
- Set the faders on the right to the machine's starting settings: Gas, Fan and Drum. Drag the slider or type the number. If the machine reports a channel itself, that fader is read-only and follows the feed.
- Charge the drum. With Auto-detect stages on (Preferences, Roasting), Factory sees the bean temperature plunge as the beans hit the drum, marks Charge and starts the clock, keeping the previous 30 seconds of pre-roll so the approach to charge is on the record. In manual mode, press the Charge button as you open the hopper. A soft banner lets you adjust an auto-detected charge if it fired early or late.
- Roast. Read the curves and log every gas, fan and drum move on the faders as you make it; each move is stamped with the roast time and drawn in its lane. In manual mode press Dry End at the end of drying and First Crack at the first audible crack; in auto mode Factory marks them from the curve using your thresholds. The moment first crack is marked, a development clock starts on that button and runs until drop.
- Press Drop as the beans leave the drum (auto mode detects the sustained fall in bean temperature). The curve freezes, the batch flips to Roasted on the Schedule, and the weigh-out dialog opens, which the next tutorial covers.
Reading the chart
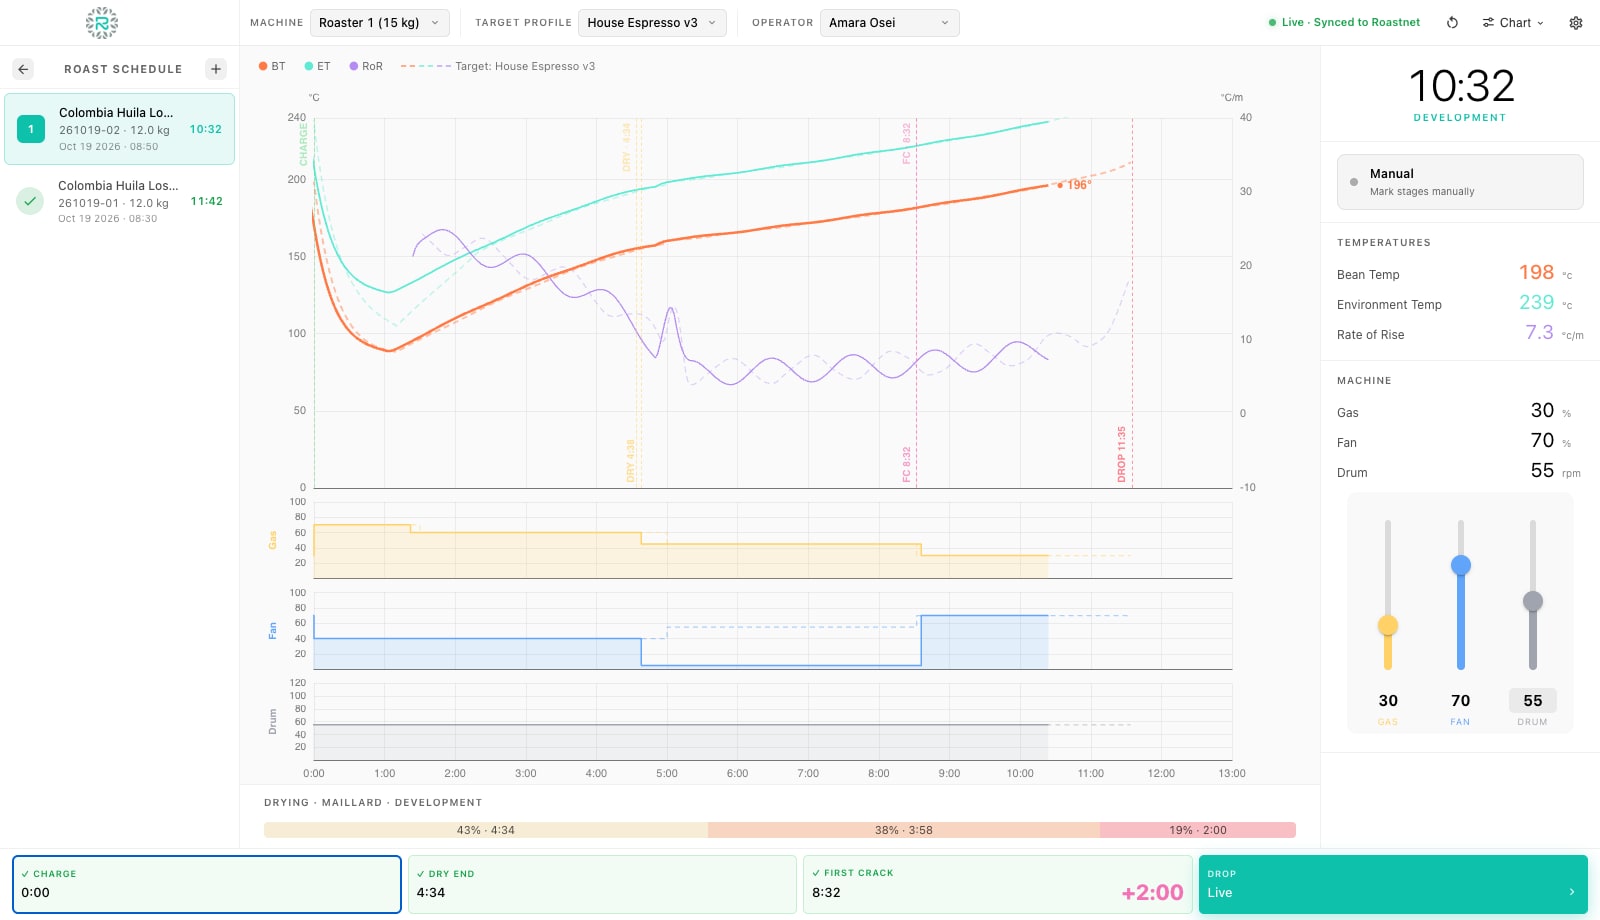
The main plot shows BT (bean temperature, the thick line), ET (environment or exhaust temperature) and RoR (rate of rise of the bean temperature in degrees per minute on the right-hand axis). The rate of rise shows the crash and flick. It is smoothed because it measures the slope of a noisy probe signal. Choose Responsive, Balanced or Smooth under Preferences, Chart, and set an exact window under Advanced if needed. Vertical markers show each stage and its time. The strip under the chart shows the three phases, Drying, Maillard and Development, as percentages of the roast so far. When a target is loaded, it appears as a dashed ghost line aligned at charge across the bean, air and automation lanes.
The Chart menu in the top bar controls what you see: the gas, fan and drum lanes under the main plot, and the optional stage buttons, First Crack End, Second Crack, Second Crack End and Cooling End. These join the four primary buttons when you turn them on. Your choices are retained. The readouts on the right show live Bean Temp, Environment Temp and Rate of Rise, the roast clock with the current phase name, and any extra sensors the machine sends.
Gas, fan and drum
Factory does not assume it can read your burner. If the machine transmits gas, fan or drum, those lanes fill from the feed and the matching fader is locked. Otherwise, drag the fader as you turn the real knob and Factory records a setpoint at that second. Hand-logged settings are saved alongside the probe curve. Even on a machine with a single thermocouple, the roast record reproduces the operator's moves when you open it later or save it as a profile.
Restart, cancel, and ad-hoc roasts
The reset icon in the top bar opens Cancel or restart roast. Nothing is saved until you drop and save, so cancelling or restarting leaves the archive and lot unchanged. Restart keeps the batch bound and clears the timeline so you can charge again after a misfire. Cancel roast discards the run and returns the batch to the Weighed queue. If the probes detect a charge while no batch is bound, for example if you added a sample without starting a batch, Factory opens the cockpit as an ad-hoc roast. It is saved and synced like any other, with the machine, profile and operator you pick in the top bar. No green is deducted because no lot was named.
Status pills and what they mean
| Pill | Meaning |
|---|---|
| Live · Synced to Roastnet | Probe feed running and the batch is a cloud schedule row |
| Synced to Roastnet | Connected, no live feed: stages and faders still log, no curve |
| Recording locally | Offline with a feed: everything is saved on the device and pushed on reconnect |
| Offline | Offline and no feed |
| Simulator | The built-in simulator is the source: a banner says it is not a real machine feed |
A roast fully logged
- Batch weighed and started from Next up or the Schedule row
- Feed live, faders set before charge
- Charge, Dry End, First Crack and Drop marked as they happen (or by auto-detect)
- Every gas, fan and drum move logged on the faders
- Target profile loaded so the ghost line is there to follow
Where Roastnet helps
Questions roasters ask
- Can I roast without any probe connected?
- Yes. Start the batch, mark the stages by hand and log gas, fan and drum on the faders. The roast saves with timings and settings but no temperature curve, and the archive shows a note instead of a chart.
- What does auto-detect use to find first crack?
- A minimum bean temperature and a drop in the rate of rise over a short window, both set under Preferences, Roasting, Stage detection thresholds. Adjust them to suit your probe placement if detection fires early or late, or switch to manual.
- Why are the stage buttons greyed out?
- Auto-detect stages is on, so the buttons are display-only and Factory marks the stages. Turn it off in Preferences, Roasting, or in the cockpit's mode card, to mark them by hand.
- What happens if the app closes mid-roast?
- The in-progress run is lost because a roast is only written at drop. The batch stays on Roasting. Open its row on the Schedule and use Reset to queue, then charge again.
- Can I follow a past roast instead of a profile?
- Yes. The Target profile menu lists coffee profiles first and past roasts of the same coffee underneath. Pick a batch and its curve becomes the ghost line.
Read next
Weigh out: record the roasted weight and roast loss
Drop is not the end of the batch. The roasted weight turns a logged roast into roasted stock and gives you the number that tells you whether this batch matched the last: roast loss.
Development time and roast logging: the business case
Every batch you do not log is a batch you cannot repeat, explain or improve. What to log, how development time fits in, and what good records save in money and time.
Create a coffee profile in Factory and roast to it
A coffee profile is a roast you want to repeat, saved with its curve, timings and targets. Factory builds one from a real batch in two clicks, then draws it as a ghost line in the cockpit so the next roast can follow it.
Run the roastery from one place
Green stock, roast plans, wholesale orders and the green coffee market in one platform, with a free roast-logging app for your machine.